Pages

Showing posts with label crafts. Show all posts

Tuesday, December 10, 2013

I (((heart))) chalkboard art!

 I have fallen in love with this whole chalkboard art thing!
I'm not the greatest artist...so I'm so thankful for all of the printables available out there!
All I have to do is scan Pinterest and it points me to so many wonderful blogs full of printables!
There are many ways to "transfer" the pattern onto your chalkboard...just Google it and you'll find a variety of methods.  But for me...I am lucky!  Being a baker, I happen to own a KopyKake projector!  So all I have to do is lay my chalkboard under my projector and trace the image!  And presto!  Woot!  I am still looking for a better chalk.  Typical packaged chalk is so..."clunky".  I have used a pencil sharpener to get a "finer" point.  I have also heard there are chalk "pens" out there.  That is what I need to get.  I just need to locate them!  Will probably hit up Hobby Lobby or Michaels this weekend.  I'm sure they have them.  If you have any suggestions or tips on chalkboard art, please leave them in the comments section!  I'd love to hear from you!

Tuesday, September 24, 2013

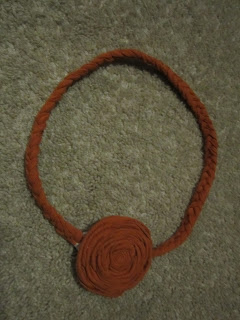
T-Shirt Headbands...

Well, I finally decided to grow out my pixie haircut.
I love it...but I'm ready to change things up again.
And what's a girl to do during all of those awful ugly "growing pains"?
MAKE HEADBANDS!!
I was browsing Pinterest and came across this idea.
This particular blog has become one of my favorite crafty blogs...and let's face it, she's so dang cute!  (I'm jealous I didn't look as good with a pixie as she did!  Ha!)
Anywho...I had so much fun making these headbands!
My mom had gotten me a bunch of old t-shirts at Goodwill a while back because I had started making t-shirt scarves (so much fun!).  I still had loads of scraps and remnants leftover from the scarves and so I saved every thing.  Well good thing I did!
Low and behold...the t-shirt sleeve headband!
You can find step-by-step instructions here at Maybe Matilda.
It's an awesome crafty blog if you like making things, and she's so funny too!
These headbands are so simple...totally "no sew"...unless you care to cinch part of them!
There's no need to even hem the edges because they roll so well when you stretch them out.
I also made some little rosettes out of leftover scraps.
I don't really have a tutorial for those.
You just basically cut a long narrow strip of fabric (maybe 1/4-1/2 inch thick).
You start rolling it.
You roll, twist the fabric, add a dot of hot glue.
Roll, twist, hot glue.
Keep going until you use all the fabric.
So easy-peasy.
I then just added a jewelry pin to the back with hot glue.
This way, I can mix and match the rosettes with the headbands with whatever outfit I'm wearing!
Hopefully these will help me get through those awkward growing out stages.
I'll keep ya posted!

Monday, June 24, 2013

Gettin' Crafty! Fun "No-Sew" Bags!

 So, I've been gettin' crafty!
Gettin' my DIY on!
I was browsing through Pinterest the other day and when I saw the words "no-sew" it totally caught my eye.  
Now, I've been wanting to learn to sew....
I've even requested a sewing machine for Christmas...
but...
Until I get one, when I see the words "no-sew", I'm all ears/eyes!
These are basically just simple tote bags with strips of fabric hot-glued to them in ruffle form.
You can use whatever scraps of fabric, ribbon, and remnants you have.
On the first one below, I used old t-shirts and re-purposed them!
I had made a whole bunch of t-shirt scarves last year and so I used the rest of the fabric on this bag!  On the bag above, I actually used scrap fabric that I picked up at Joanne Fabrics.
You can get remnants pretty cheap.
 I used a couple of old tote bags that had logos on them that I didn't really care for.
Now...they're much more pretty and girly!
Oh yeah!

Wednesday, February 20, 2013

Re-Purposed Crayons...(Craft-Time With Natee)

Nate is my crafty, creative boy.
He is always looking for something new to do or try.
Busy busy busy.
That's my Natee!
He saw an idea (I'm not sure where)...
For re-purposing old crayons.
And so we did.
I had received a silicone baking mold as a gift from someone and had never used it.
So we thought it would be the perfect mold for this project.
First he removed all of the paper from his old bits and pieces of crayons.
Then he broke them into small pieces.
Next we melted them in a preheated oven of 225 degrees.
Once melted, we removed them from the oven and let cool.
Then...voila...they pop right out of the mold!
What cute little re-purposed crayons!
You can do solid colors...or mix them together for a rainbow effect like Nate did!
Try it with your littles and leave a comment on how they turned out!
We'd love to hear your success stories!

Tuesday, September 25, 2012

And a few more scarves...

 Everyone keeps asking when I'm going to sell some of my t-shirt scarves.
Well, right now...I'm just having too much fun creating them all and keeping them myself, LOL!
I have to admit, the idea of shipping always scares me too.
Hubby says I should be able to get them into the "flat rate" boxes if people really do want to order...so maybe it's something I'll have to explore!
This top one is another "link scarf" I did in pink, yellow, and white...my three favorite colors!
 This one is a red spaghetti scarf and a cowl scarf layered with it.
And finally a ruffle scarf in yellow.
Let me know what you think of all these scarves I've been posting.
...and if you think I should sell them...

Monday, September 24, 2012

A few more t-shirt scarves, pins, and hair clips...

 So I finally got the time to work on some more of my t-shirt scarves yesterday.
I really like how this red, white, & blue patriotic one turned out.
Perfect for July 4th!

 This purple cowl and lavender spaghetti scarf are two put together.
As I mentioned before, this is one of my favorite aspects of t-shirts scarves...the ability to mix and match the colors and styles!
 Then with the leftover scraps, I decided to make a few more pins and hair clips to match!
Excuse the glue, still gotta remove that...hehe!

Sunday, September 16, 2012

My newest project...T-shirt Scarves!

So...
I had been seeing these adorable scarves all over Pinterest and blogs.
All different types...
And I had no idea how to make them or WHAT they were made from.
I am NOT a sewer (although I'd like to learn).
Anywho...
Come to find out, after "pinning" these photos on Pinterest and then following up on the blogs...
They are simply made from old t-shirts!
The first one up top in orange, is called a "Spaghetti Scarf".
INCREDIBLY easy and most importantly for me...
No sewing!

This next purple, gray, and white one is a "Link Scarf".
Super easy!

This one is a "Ruffle Scarf" and although it takes more time...it is incredibly easy as well!
I also learned how to make these mini "Poms".
They are great for your hair or to pin on the scarves!

Here is the "Link Scarf" with three mini-poms pinned to it!
This is the "Spaghetti Scarf" doubled up with two mini-poms on it.
This pink one is a combination of several.
It's a "Spaghetti Scarf" doubled up and I also added a "Braided Spaghetti Scarf" to it.
Then I also learned how to make these rosettes to pin on as well!
This gold scarf is one of the EASIEST to make...it's a simple "Cowel Neck Scarf".
I added two rosettes pinned to it.
This is another "Braided Spaghetti Scarf" with a matching rosette.
A bunch of rosettes...for either pinning or as hair clips!
The great thing I love about these scarves, is that you can mix and match them and wear them so many different ways!
This is the long pink "Spaghetti Scarf" and also the orange "Spaghetti Scarf" doubles up, with a pink "Braided Spaghetti Scarf" and and orange mini-pom.
Some hair clips...
A triple purple rosette and a gray rosette.
This is one of my favorites for fall...
The rust "Spaghetti Scarf" tied with gold links and a gold rosette.
Add the gold "Cowel Neck Scarf" and a rust "Braided Spaghetti Scarf" with a rosette!
Ooops!  I posted this one sideways!  Hehe!
I have to say...
This scarf, although one of my favorites...WAS the most difficult to make.
It DOES require sewing and since I don't have a sewing machine, I used fabric glue (not recommended, LOL!  It did work though!)
It is made with two tees and braided together on the side.
I added two rosettes to it.
You'll have to use your imagination since I posted it sideways...or tilt your head!  Haha!
If you want to make any of these...go to Pinterest and check out my boards...I pinned them all and you'll be able to find the links to all of the blogs with instructions.
Or you can just type in "t-shirt scarves" and a million different pictures and links will come up!
Let me know which you try!  I'd love to hear how they turn out!
Happy "scarfing"!